Remote Desktop is a new feature incorporated in Windows 10 for controlling or managing other PCs or servers remotely without being present at the location. It is commonly known as Remote Desktop Protocol (RDP). There are various other alternatives, or third party tools already available, like TeamViewer, join.me, Chrome Remote Desktop, etc. But if you have got Windows 10 installed to your system, no such extra hassle of third party tools is required. RDP comes pre-installed with Windows 10, so it is quite handy. Before you access your computer from other computer on a network, you must have a network access permission to the remote computer and must enable Remote Desktop on that computer. Before you start to connect, make sure the Remote Desktop connection is allowed in firewall.
In today’s guide, we will demonstrate the ways to activate or enable the Remote Desktop Feature on Windows 10.
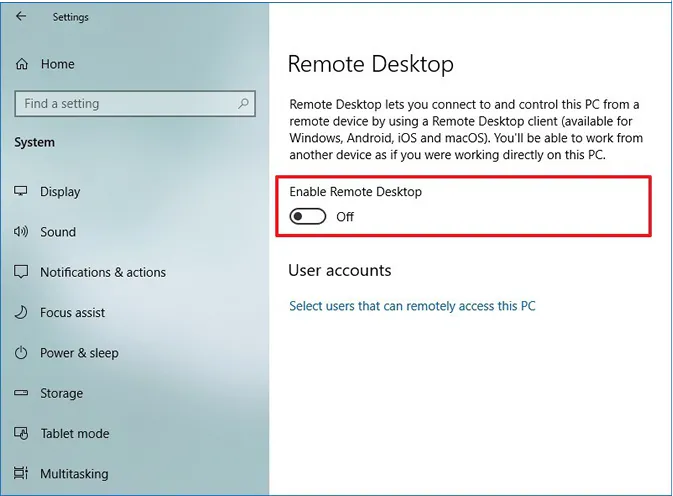
Settings app is easily accessible so this method should be attempted first. Just follow the step-guideline below:
Step 1. Go to "Settings".
Step 2. Click on the "System" option and then choose "Remote Desktop" option.
Step 3. Toggle on the "Enable Remote Desktop" option switch.
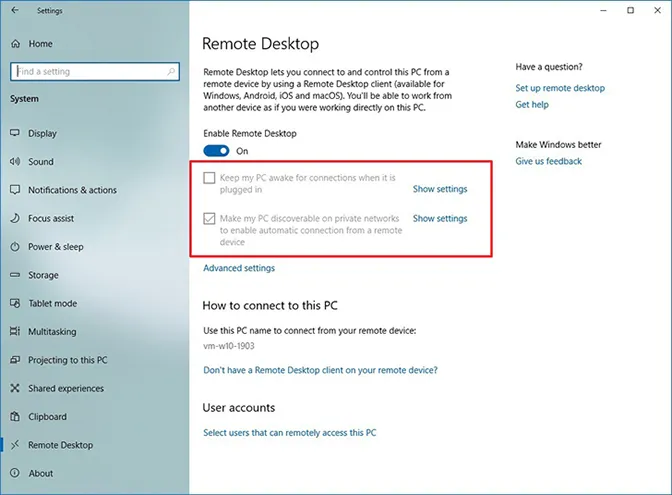
Step 4. Now you are free to use the Remote Desktop utility to connect to other remote servers or PCs. Moreover, you will also notice that two more options "Keep my PC awake for connection when it is plugged in" and Make my PC discoverable on private networks to enable automatic connection from a remote device" have got activated automatically which ensures that you can always connect even when you are at a distant place.
Though, you must have found the Settings app to be the quickly accessible option to activate Remote Desktop, but there is another possibility to do the same task via control panel.
Step 1. Go to "Control Panel" and open it.
Step 2. Click on the "System and Security" button.
Step 3. Under the "System" panel click on the "Allow remote access link" option.

Step 4. Now the "System Properties" Windows turns up. Here under the "Remote Desktop" category, select the option "Allow remote connections to this computer".

Step 5. Click the "Apply" button, then "Ok" and finally exit the control panel.
Using command prompt to enable Remote desktop or any other feature is a bit risky, if you are not fully adept with the commands handling. But at the same time, it is quite handy if you know how to do it.
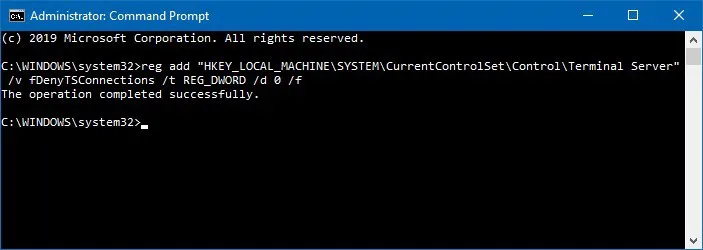
Step 1. Open "Start" and type "command prompt". From the search result, right click on the "command prompt" option and select "Run as administrator" from the drop down menu.
Step 2. When the black dialogue box of cmd opens up, enter the following command and hit "Enter":
reg add "HKEY_LOCAL_MACHINE\SYSTEM\CurrentControlSet\Control\Terminal Server" /v fDenyTSConnections /t REG_DWORD /d 0 /f
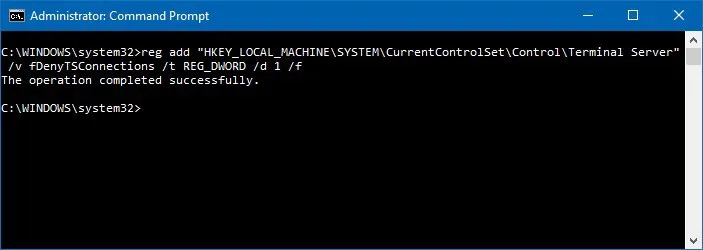
Step 3. In case you wish to disable the Remote Desktop protocol, type the following command and hit “Enter":
reg add "HKEY_LOCAL_MACHINE\SYSTEM\CurrentControlSet\Control\Terminal Server" /v fDenyTSConnections /t REG_DWORD /d 1 /f
As you can see it's too easy to enable remote desktop on Windows 10. All the methods mentioned above are fully tested before presented here. So you can completely rely on them. As far as safety is concerned, try to stick to the first two methods. The third method of command prompt is not recommended if you are a novice. Even a slightest mistake can render big problems. tion.

Nadine is the Editorial Director at PassCue Studio. You can also find her on social network.