It’s true that when you have an ultrathin fancy laptop in your possession, it creates a spark of a technical stature amongst your associates, but the problems that linger with a laptop are no different than of a usual everyday computer. The most bothersome issue that you would come up with every now and then is the space unavailability in your laptop. When you store a lot of stuff, music, videos, softwares, movies, you don’t keep a track or an account of unnecessary burden that you are creating for the internal storage of your laptop. Sometimes even an external drive is not enough to incorporate your entire collection, so you can imagine the threadbare condition of your laptop with its internal storage. By and by your system speed reduces below the optimal level hindering you from doing even the menial tasks with your system. At that point, you seriously need to do something immediately, or your laptop would soon collapse or crash due to overburdening.
Here are some lists of methods elaborated with an intention to help you out all. Read them first carefully before you make an attempt to apply them in real.
The first and the foremost step is to get rid of the space hogging culprits that are the unnecessary contents which you don’t even use anymore. These are basically the unused system files and applications. Now in order to clean it all up, we would here use the Window’s built-in feature, Disk Cleanup to do the job. Read on as it is explained below in steps:
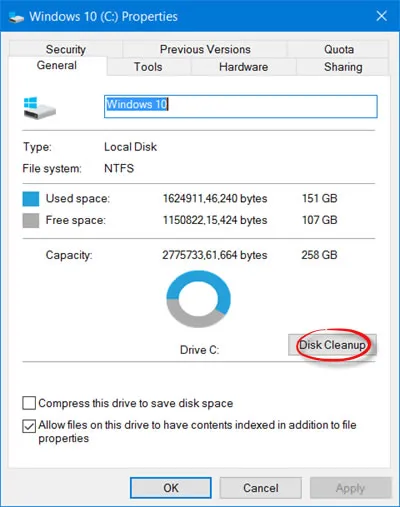
Step 1. First type “disk cleanup” in the search box of the “Start” menu and hit “Enter”.
Step 2. Select the drive you wish to clean up, and then click “Ok” to start the disk cleaning process.
Step 3. The process will take few moments before it is completed. If it is taking more time than you expected, it is due to voluminous data collection of yours, so you need to be patient throughout.
As the name suggests, Temp folders usually contain the files which are used temporarily by the operating system. But they are not removed once your system is done with them. And that’s how they keep on being accumulated in your system storage. Clean it at least once in every week following the pathway mentioned below:
Step 1. Turn on your system and type “Run” in the Windows search box. A small search box would pop up at the left bottom corner of your screen. Type in their “%temp%” and hit “Enter”.
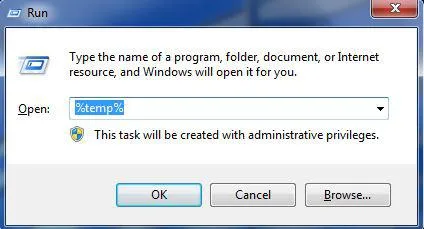
Step 2. Your Temp Folder would be opened up instantly. All the files that you get to see out the temporary garbage files your system have been accumulating so far.
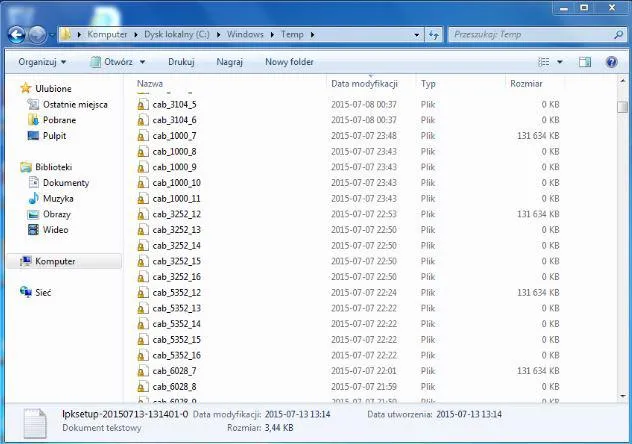
Step 3. Select them all, and press “Shift + Delete” to delete them permanently from your system. Few files will not be deleted no matter how many times you try, which are exactly the files which are yet to be used by the OS, and need not be tampered with.
Repeat the process after every 2 to 3 days to keep your laptop clean and exuberant.
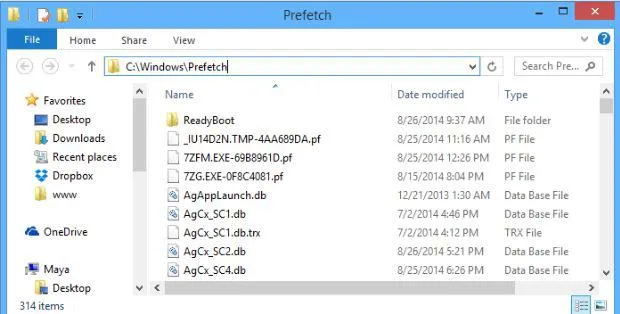
Generally Prefetch folder contains certain files that store the information of what you work on or you start your computer. This backdrop stored information helps the computer to boot speedily. But nevertheless, few of these files are not used by the system mostly. Thus few experts claim that deleting the Prefetch Folder contents actually saves the overburdening of your system. How to do it? Then read further to know it in full length:
Step 1. Press “windows + R” to launch the “Run” tool which turns up instantly at the extreme left corner of your home screen just above the start menu icon.
Step 2. Enter “Prefetch” and press “enter”. You will be prompted with UAC (User Access Control” to confirm the access, just click “Continue” to open the folder.
Step 3. After the folder opens up select all the contents of the folder and press “Shift + Delete” to delete them permanently from the system.
This is one of the loftiest alternatives to free up your memory space. Storing data on your cloud servers that is on the web saves you the unnecessary trouble of worrying about your laptop storage space availability. Cloud storage services provides tons of free space online for example Microsoft SkyDrive, gives you 7 GB to 25 GB free. If you wish to opt for more, then you have to pay for it. While Google Drive, Box, SugarSync Free offers only around 5 GB free and extra space will be under additional charges.
Few of these services also allow you to sync your folders with them. That way you don’t have to manually store them all the time, rather when you store them on your designated folder, they are stored on the server of their own accord.
This is the ultimate method that can save you the trouble of paying extra on Web for storage and burdening of your Laptop internal storage on a serious note. When you see your laptop getting overflowed with contents which is often marked by the poor performance of the system, get an external drive and move all content of the laptop to a new hard drive. The method is very simple.
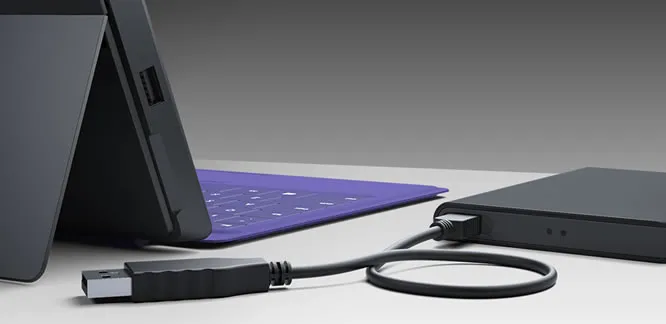
Step 1. Connect your external drive to your laptop via a USB cable.
Step 2. Copy all your collective data and paste them to the newly attached external drive. Wait until the transfer is done which might take around few minutes to an hour to be finished.
Step 3. Detach the USB cable from the laptop and check the new condition of your device.
To compress the Windows 10 files and apps, we must use a third party software called Compact OS. It uses the command prompt technology to zip the operating system files that will help to free up a ton of space. It is typically used for those who have low hard drive storage space. You can use this program without any tension since it doesn’t impact the computer performance whatsoever.
Disclaimer: Kindly create a complete backup of the computer before using this program in order to avoid any kind of risk of losing data from the computer.
Step 1. Click on Start.
Step 2. Type “CMD” and hit enter to run the Command Prompt app.
Step 3. Type the following command line and hit Enter
compact.exe /compactOS:always
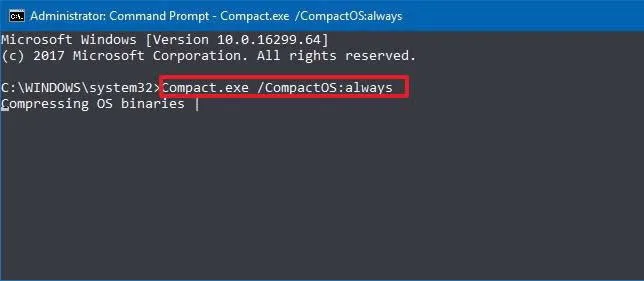
After entering the command line, the Windows 10 files and apps will be compressed and free up around 2GBs of space. The process will take somewhere between 10-20 minutes and you won’t be required to restart the PC since the effects will be applied immediately. In case, if you want to reverse the feature then you can again open the Command prompt app and type the following command to undo the changes –
compact.exe /compactOS:never.
It is true that this feature can be applied by anyone but we will recommend to use this feature only if there’s no other option for you.
If you are still running low on hard drive space then you must either upgrade the hard disk storage space or consider getting an external hard drive. Basically, all external hard drives can be connected to any computer via USB data cable. You can then migrate all the useless files like apps, games, movies, documents, songs, etc. to the external drive to free up all the space on your computer. It’s definitely possible to set up the Windows 10 settings that will allow you to save all the new files on the new External Drive automatically. To activate that feature, follow these steps –
Step 1. Click on Start followed by “Settings”.
Step 2. Click the System option.
Step 3. Now press the “Storage” button.
Step 4. Under the “More Storage Settings”, select “Change where new context is saved” button.
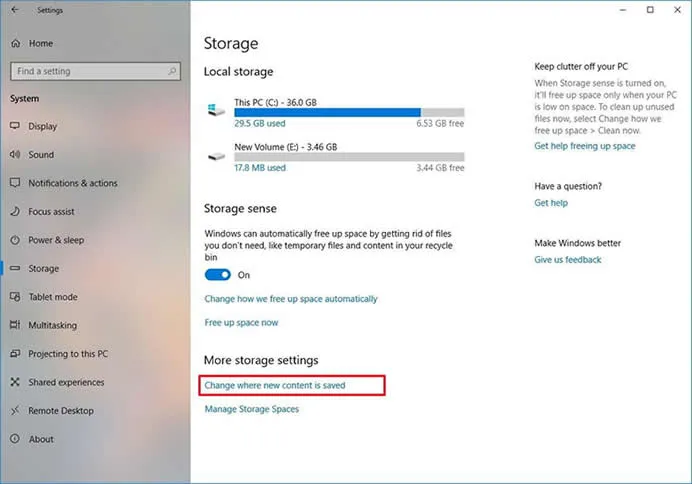
Step 5. Click on the drop-down menus and choose the external drive to save all the new files automatically.
Step 6. Click on “Apply” and it’s done. You can now automatically download the new files to External hard drive by default.
Windows 10 has made it extremely easier to even move the games, apps and its data to the External hard disk without re-installing them all over again. Follow the below steps to move the apps and games to the new location:
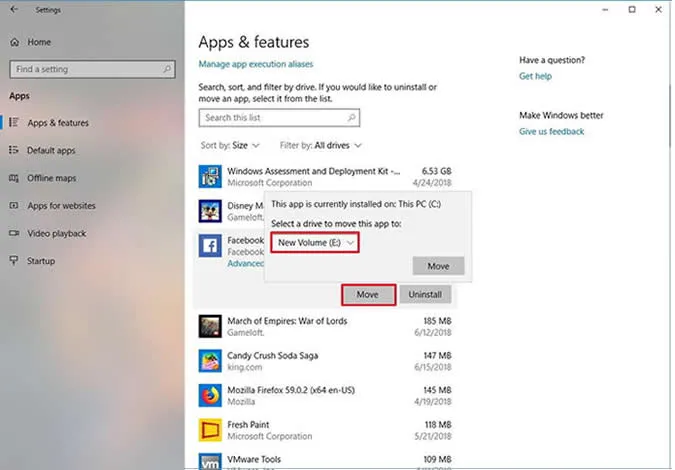
Step 1. Again, click on Start then Settings.
Step 2. Click the Apps icon followed by “Apps & Features”.
Step 3. Click on any app and game to migrate.
Step 4. Click on “Move” button then choose the new location to save them.
Step 5. Keep repeating the steps for every game and apps installed on the computer.
If everything is done as accurately as explained above, then you are most likely to get along with your expectations. Freeing up laptop storage is much more required than that of a computer. By default, a PC can withstand a lot of data turbulence which is fundamentally not possible for a laptop to handle, since they are fragile in usage. So make the best use of the methods aforementioned, and enjoy working with your laptop without any further storage intervention.

Nadine is the Editorial Director at PassCue Studio. You can also find her on social network.