If your system falls prey to malware attack, windows crashed during update, windows freezes, black screen with cursor and any other issues that cause your system cannot be used properly. So, a bootable USB flash drive will become the need of the hour in order to reinstall Windows system or fix a broken Windows. Unfortunately, it’s not easy to burn ISO to USB as burning is different from just copying the ISO file, “Burning” means that it writes ISO image file and booting information to a USB flash drive to make USB drive can be bootable on a MBR or UEFI computer.
Keeping such things in mind, you will have to use some professional ISO to USB burner softwares to complete this complicated burning process. We have come up with a tutorial of four best such tools which can help you burn your windows ISO to USB without occuring any errors.
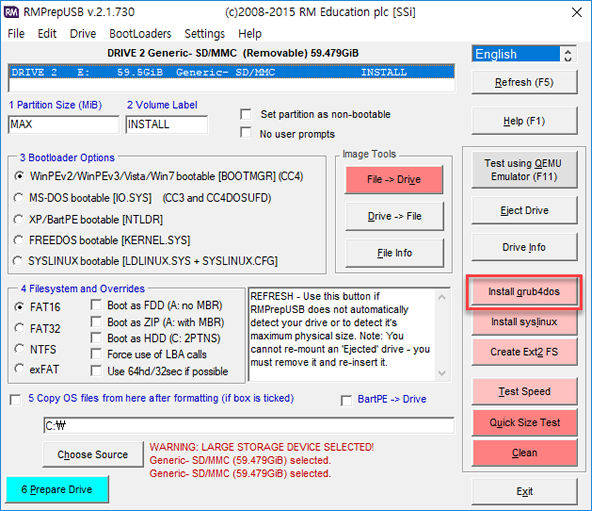
RMPrepUSB is a versatile software that make it easy to create bootable USB drives and also format drives. It can be of great help on those scenarios when netbooks doesn't include DVD drives. RMPrepUSB was initially developed to take on partitioning, wiping and formatting USB drives. However, lately it has taken the shape of a larger and feature-rich software depending on your needs. Such as: format device, partition, check speed tests, make drives bootable, recover lost files, and more.
Step 1. Firstly, download the RMPrepUSB zip file and next extract the file inside it then install it.
Step 2. Now you will have to format the drive by filling in or checking the following details:
● Partition name.
● Drive name
● Bootloader options wherein the first one needs to be selected in the case of Windows installations.
Step 3. Select the system file format, like: FAT16, FAT32, NTFS, exFAT.
Step 4. Tick the box ”Copy OS file from here after formatting”, then click Choose Source button to import your IOS location.
Step 5. Once you are done the above steps, you can simply click on the “Prepare Drive” button. Doing this will format the same and thereby create a bootable ISO drive.
This professional tool is compatible with both Mac and Windows devices. It allows users to seamlessly extract, create, burn, copy and edit ISO files. You can bank on this cross-platform software to guarantee an intuitive user interface which makes it well suited for beginners to create a bootable device from USB and DVD/CD. This is a flexible program with a unique partition feature that often lacks in other similar software, it supports both MBR boot and UEFI boot, because most new computer are using UEFI boot to install and manage BIOS. PassCue for ISO supports to write 4 system file: FAT, FAT32, exFAT, and NTFS file system and only 3 steps required to make a bootable USB or DVD disk without generating errors.
It works with all Windows ISO image including Windows 10, 8, 7, Vista and XP, and can backup your files into a ISO format. This handy utility is extremely easy to use and be available for both personal and commercial use. It supports standard ISO9660 (default), Joliet File System and other ISO standard.
Step 1. First you will have to download the program in your system and run it as dministrator for making full utilisation.
Step 2. From the primary interface, you will have to click on ‘Burn.’
Step 3. In the next step, you need to choose the ISO file you wish to work with. Herein it is imperative to note that the ISO file should ideally be an operating system installation file and not a video or music ISO file.
Step 4. Now you need to click on ‘Create a Bootable USB’ and insert your USB drive in to your system. You will also be required to specify the file format as FAT 32, FAT or NTFS from the ‘System File’ section.
Step 5. After deciding on all these priorities, you will have to click the ‘Burn’ button. It will take about a few minutes’ time and after that the bootable disk shall be created successfully.
Your Universal Multiboot Installer (YUMI) is another popular ISO burning program which is compatible with both Windows and Linux. Its main function is to create bootable USB drives from the rescue disk, operating system ISO, antivirus utilities, disc cloning, diagnostic tools, WinPE and more. YUMI usually works like other command ISO burner tool, but except uses syslinux to boot distributions which saved in the Multiboot folder of USB drive.

Step 1. Firstly, you need to download the application on your PC and insert a USB drive into the same.
Step 2. Launch the application and specify the USB name. You will also have to select the ISO file which is going to be burned on the USB and the distribution name in this step.
Step 3. Once you are done with all the necessary selections, click on the ‘Create’ button to initiate the creation of your multiboot USB.
Step 4. Restart your PC setting it to boot from the USB device.
Very few Windows users are aware that Windows 10 provides an hidden tool to help in burning regular data and Windows ISO images to USB by using command prompt. This process is a little more complex because it need to type command-line parameter, which may cause the system crash in risk. Use it with caution.
Step 1. Open Widnows shell first then type the code below to loate the burning tool.
C:\windows\system32\isoburn.exe
Step 2, Burn the ISO file using following command prompt:

It should be like this and ISOBURN.exe will open.

Step 3. Now, it’s time to start burning ISO file in Windows 10, just launch the Command prompt, then type the following command and press enter:
ISOBURN.EXE /Q F: c:\Sample.ISO
In this command line, F: is the location of your USB, DVD drive’s name and C:\Sample.ISO is the your source ISO location.

Then go to the USB drive to see if the bootable USB was created succecssfully.
Windows USB/DVD Download Tool is small executable and official software that provided by Microsoft, it aims to help user to download Windows ISO and create a bootable disk from USB or DVD directly. To us this tool properly, make sure you’ve been installed Microsoft .NET Framework version 2.0 or higher on your computer. It’s easy to use and mostly targeted at beginners who are on the lookout for user-friendly solutions to ISO burning. This software is free from all spyware and adware which makes it perfect for personal use.

But it’s not perfect as it lacks some options when you need to customize the bootable USB drive, for example, you can’t change the partition scheme, MBR or UEFI boot, system file format, and you’re not allowed to check bad blocks and create extended labels. And in most time, it will occur some unknown error when burning ISO to USB drive, such as: Error code 0x80042405 - 0xA001A, not identify USB drive and more.
The ISO image files have to be burned onto the disk while creating a Windows bootable USB on your device. This can be done by partitioning a separate space within the disk for availing the compressed files. Now, you can try to burn Windows 7/8/10 ISO image to USB in an easy manner by taking your pick amongst the five-different software’s discussed above.

Nadine is the Editorial Director at PassCue Studio. You can also find her on social network.